How to Move a Countertop Composter Between Apartments: Step‑by‑Step Guide to Cleaning, Packing, and Spill‑Proof Transport
Moving an apartment often requires careful planning for every household item, and a countertop composter presents unique challenges. This guide explains how to prepare, clean, pack, and transport a kitchen composter so that it arrives at the new residence in perfect working order. The reader will learn practical techniques, recommended tools, and troubleshooting tips that protect both the device and the surrounding environment.
What You’ll Need
- Cleaning supplies: mild dish soap, soft scrub brush, and microfiber cloths.
- Protective packaging: bubble wrap, moving blankets, and sturdy cardboard boxes.
- Sealable plastic bags for loose debris.
- Ouaken 4L Electric Kitchen Composter (Black) – the primary device to be moved.
- Epica 1.3 Gal Kitchen Compost Bin – useful for temporary waste collection during the move.
- Natridy Electric Kitchen Composter – optional backup unit for households that require continuous composting.
Step 1 – Inspect and Power Down the Composter
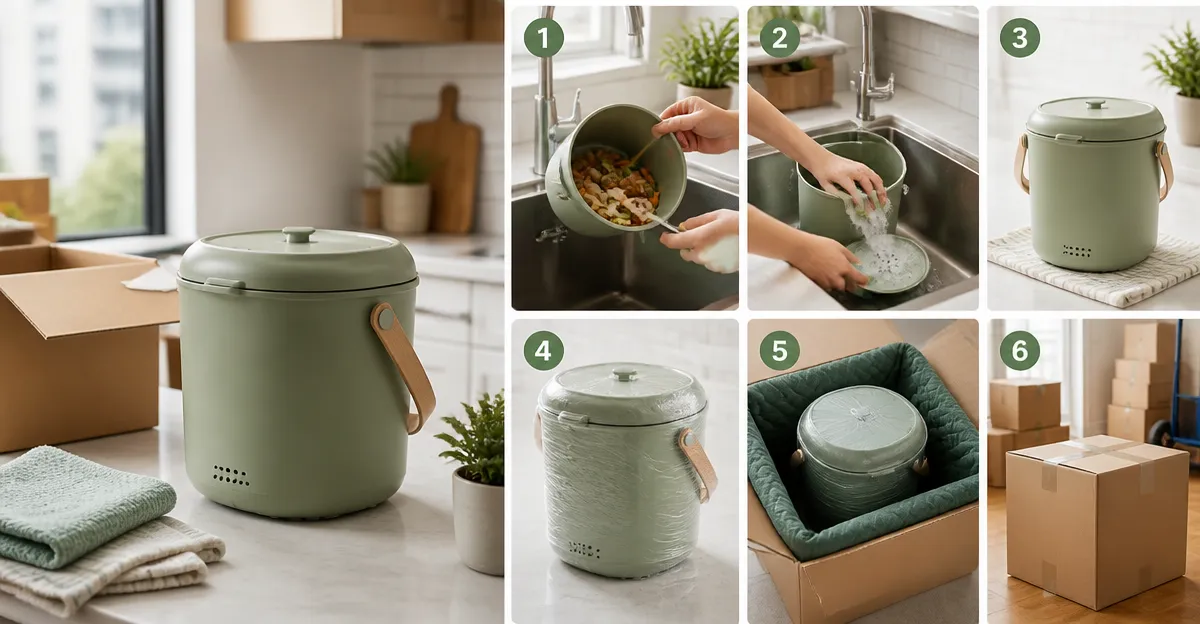
Before any cleaning or disassembly begins, ensure that the Ouaken 4L Electric Kitchen Composter (Black) is unplugged from the electrical outlet. Remove any remaining compost from the bucket and set it aside in a sealable bag. This precaution prevents accidental activation of the motor and eliminates the risk of spills during handling.
The Ouaken model features a transparent lid, an easy‑touch interface, and three operating modes—Crush, Ferment, and Clean. Its 4‑liter capacity makes it suitable for a family’s daily waste, and its low‑noise operation (under 40 dBA) ensures that cleaning can be performed at any time of day without disturbing neighbors. The unit is priced at $215.97 and holds a rating of 4.2 out of 5 stars from 914 reviews, indicating reliable performance.
When the unit is powered down, inspect the exterior for any visible damage to the carbon filter or the detachable bucket. Replace the carbon filter only if it shows signs of wear; a fresh filter maintains odor‑free operation during the move.
Step 2 – Clean the Interior and Exterior Thoroughly
Begin by filling a basin with warm water and a few drops of mild dish soap. Use a soft scrub brush to remove residual food particles from the grinding chamber. The high‑temperature drying process inside the Ouaken unit reduces waste volume, but small fragments may remain on the blades. Gently brush the blades while avoiding direct contact with the cutting edges.
After scrubbing, rinse the bucket with clean water and place it on a microfiber cloth to dry. The detachable bucket is dishwasher safe, which provides an alternative cleaning method for those who prefer automated washing. Dry the bucket completely before proceeding to the next step; moisture can cause rust on metal components during transport.
For the exterior, wipe the stainless‑steel housing with a damp cloth and a non‑abrasive cleaner. The sleek design of the Ouaken composter resists fingerprints, but a polished surface reduces the chance of scratches during packing.
Step 3 – Disassemble Removable Components
Remove the detachable bucket, the carbon filter, and the lid. Each component should be wrapped individually in bubble wrap to protect against impact. The carbon filter, which lasts up to five months, is a consumable item; keep it in a sealed bag if you intend to reuse it at the new location.
If the model includes an auto‑cleaning mechanism, consult the user manual to disengage any internal springs or gears that could shift during movement. The Ouaken’s low‑speed, high‑torque blades are designed for durability, but securing them prevents internal wear.
Place the wrapped components in a sturdy cardboard box that fits snugly around them. Fill any empty space with packing peanuts or crumpled newspaper to avoid movement inside the box.
Step 4 – Pack the Main Unit for Spill‑Proof Transport
Wrap the main housing of the composter in a moving blanket, securing the blanket with packing tape. The blanket acts as a cushion against dents and scratches. Next, place the wrapped unit inside a double‑walled cardboard box that is at least two inches larger on each side than the device.
To achieve a spill‑proof seal, line the bottom of the box with a thin sheet of polyethylene sheeting. This barrier prevents any residual moisture from leaking onto other items. Position the unit upright, as the internal mechanisms are calibrated for vertical orientation.
Fill the remaining voids with additional bubble wrap or foam inserts. Ensure that the box can be closed without forcing the lid; a tight seal indicates that the contents are secure.
Step 5 – Load the Packed Composter into a Vehicle
When loading the box into a moving truck or car, place it on a flat surface and avoid stacking heavy items on top of it. The Ouaken’s weight, approximately 12 pounds, is modest, but excessive pressure could deform the carbon filter housing.
If additional space is required, use the Epica 1.3 Gal Kitchen Compost Bin as a temporary holding container for any fresh scraps generated during the moving day. The Epica bin is constructed from high‑grade stainless steel, priced at $29.98, and holds a rating of 4.6 out of 5 stars from 20,845 reviews. Its airtight lid and replaceable charcoal filter keep odors contained while the primary composter is in transit.
Secure the box with straps or rope to prevent shifting during transport. A stable load reduces the likelihood of internal component displacement.
Step 6 – Unpack and Reassemble at the New Apartment
Upon arrival, inspect the moving box for any signs of damage. Remove the bubble wrap and moving blanket, then place the composter on a level countertop near a power outlet. Re‑insert the carbon filter, attach the lid, and slide the detachable bucket back into place.
Before plugging the unit back in, perform a brief test run using the Clean mode. This cycle verifies that the blades rotate freely and that the internal sensors function correctly after transport. Listen for any unusual noises that could indicate loose components.
If the unit was stored for an extended period, allow it to sit for 15 minutes to reach room temperature. This precaution prevents thermal shock to the ceramic‑coated bucket, a feature shared by the Natridy Electric Kitchen Composter, which boasts a 10,000‑hour brushless motor and a detachable blade for easy cleaning.
Step 7 – Resume Normal Composting Operations
After confirming that the unit operates without error, resume regular composting by adding kitchen scraps to the bucket. Choose the appropriate mode based on waste type: Crush mode for quick volume reduction and low energy consumption, or Ferment mode for higher‑quality fertilizer output.
Maintain a routine of emptying the bucket before the compost dries completely, as recommended by the manufacturer. This practice prevents clumping and extends the lifespan of the carbon filter.
Periodically check the carbon filter and replace it when the odor‑control efficiency declines. The filter’s five‑month lifespan ensures continuous odor‑free operation, which is essential for indoor environments.
Tips & Pro Tips
- Label each wrapped component with a waterproof marker to simplify reassembly.
- Keep a spare set of carbon filters on hand; they are inexpensive and guarantee uninterrupted odor control.
- Store the composter away from direct sunlight in the new apartment to avoid overheating of the internal motor.
- Use the Epica bin as a secondary waste collector for days when the Ouaken unit is in a cleaning cycle.
- Schedule the first full Ferment cycle after the unit has been idle for at least 24 hours to allow the internal temperature sensors to calibrate.
Troubleshooting
Problem: The unit does not start after transport.
Solution: Verify that the power cord is fully inserted and that the outlet supplies the correct voltage. Reset the unit by holding the power button for five seconds, then attempt to start a Crush cycle.
Problem: Unusual vibrations during operation.
Solution: Ensure that the detachable bucket is seated correctly and that the lid is closed securely. Loose components can cause imbalance.
Problem: Persistent odor despite a new carbon filter.
Solution: Check for residual food particles in the grinding chamber. Perform an additional Clean cycle and inspect the filter housing for cracks.
Conclusion
Moving a countertop composter requires meticulous cleaning, careful disassembly, and protective packaging. By following the steps outlined above, one can transport the device without spills, maintain its performance, and resume sustainable kitchen practices in a new apartment. The recommended products—Ouaken 4L Electric Kitchen Composter, Epica 1.3 Gal Kitchen Compost Bin, and Natridy Electric Kitchen Composter—provide reliable tools that simplify each phase of the move.
Products Mentioned in This Guide
Frequently Asked Questions
What is the best way to clean a countertop composter before moving it?
Rinse the bin, scrub with mild dish soap and a soft brush, then wipe dry with a microfiber cloth to prevent odors and residue.
Which packing materials protect a kitchen composter during transport?
Wrap the unit in bubble wrap, cushion with moving blankets, and place it in a sturdy cardboard box for spill‑proof safety.
How can I prevent waste spillage while moving the composter?
Seal any loose debris in plastic bags and empty the bin of all compost before packing the device.
Do I need to disconnect any power source before moving an electric composter?
Yes, unplug the unit, coil the power cord, and secure it with tape or a zip tie to avoid damage.
What should I do if the composter leaks during the move?
Place a waterproof liner or tray inside the box and use additional bubble wrap around any wet spots to contain moisture.