How to Store a Countertop Composter During Long Travel: Step-by-Step Guide to Odor-Free, Pest-Proof Vacation Storage
Introduction
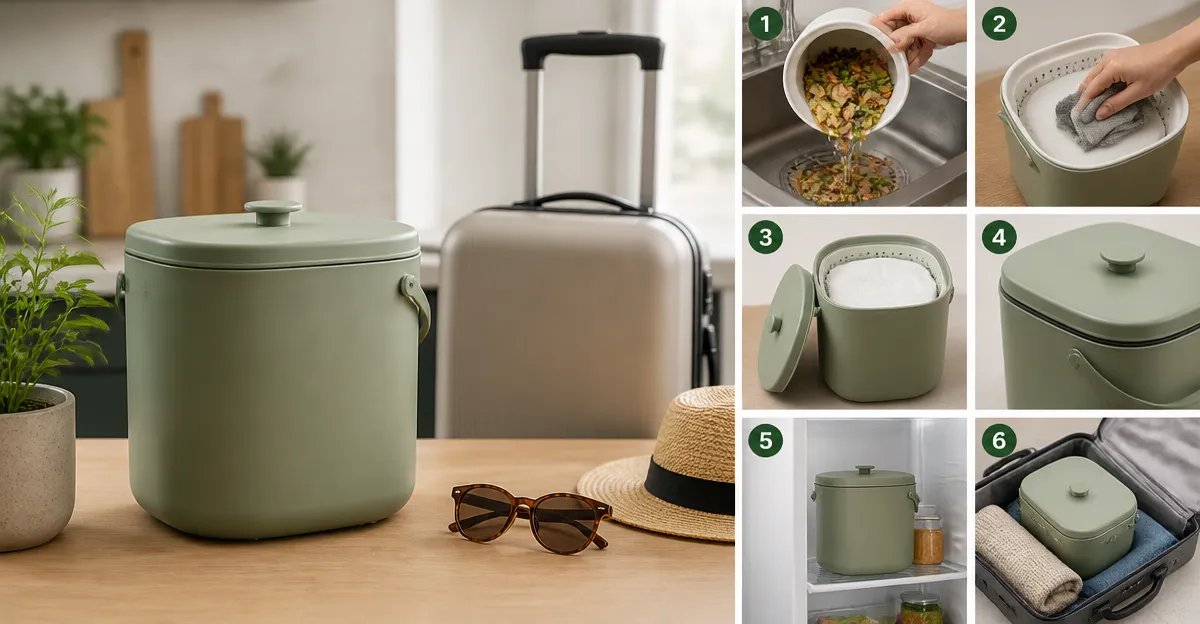
When a vacation or extended trip approaches, many environmentally conscious households wonder how to protect their countertop compost bin from odors, leaks, and pests. This guide explains exactly what to do, why each action matters, and which tools can simplify the process. By following the steps, one can ensure that the composting system remains clean, functional, and ready for immediate use upon return.
The information presented is based on real‑world experiences from users of popular countertop composters such as the Epica Kitchen Compost Bin and the Utopia Kitchen Compost Bin. Understanding the specific features of these products helps to tailor the storage method to each model.
Readers will learn how to empty, dry, seal, and protect a compost bin for weeks or months away, while avoiding common pitfalls such as mold growth or unwanted insects. The guide also highlights optional accessories that enhance odor control and pest protection.
What You'll Need
- Cleaning supplies: mild dish soap, soft sponge, and a clean towel.
- Drying aids: silica gel packets or clean, lint‑free cloths.
- Odor‑absorbing material: replaceable charcoal filter (included with most bins).
- Sealable storage container or large zip‑lock bag.
- Optional protective tools: Epica Kitchen Compost Bin or Utopia Kitchen Compost Bin for manual bins, and Airthereal R500 Electric Composter if an electric model is being stored.
Step 1: Empty the Composter Completely
The first priority is to remove all remaining organic material. Even a small amount of moist waste can ferment during travel, creating unpleasant odors and attracting insects. Open the lid, tilt the bin gently, and dump the contents into a trash bag or a temporary outdoor compost pile.
For electric models such as the Airthereal R500 Electric Composter, ensure that the internal bucket is also emptied, as residual material can harden inside the drying chamber.
After removal, inspect the interior for any stuck particles. Use a soft sponge with warm, soapy water to loosen residues. This thorough emptying prevents mold formation while the bin is sealed.
Step 2: Clean the Interior and Exterior
Cleaning removes lingering food particles and neutralises bacterial growth. Fill a basin with warm water and a few drops of mild dish soap. Submerge the removable bucket (or the stainless‑steel container for manual bins) and scrub the interior walls with a non‑abrasive sponge.
The Epica Kitchen Compost Bin features a one‑piece molded stainless‑steel design that is rust‑resistant; a simple hand‑wash is sufficient. Its replaceable charcoal filter should be rinsed gently and set aside to air‑dry.
Rinse thoroughly to eliminate soap residue, then dry with a clean towel. For the Utopia Kitchen Compost Bin, the stainless‑steel surface also tolerates a dishwasher cycle if preferred, though hand‑washing preserves the polished finish.
Step 3: Dry the Bin Completely
Moisture is the primary catalyst for odor and pest issues. After cleaning, allow the bin to air‑dry in a well‑ventilated area for at least four hours. Place the container upside down on a towel to facilitate drainage.
If time is limited, use silica gel packets inside the bin to absorb residual humidity. These packets are inexpensive and can be reused after re‑charging.
Electric units such as the Assark Smart Electric Composter have internal electronics; ensure that the power cord and control panel are also dried before storage to avoid corrosion.
Step 4: Replace or Seal the Charcoal Filter
A functional charcoal filter is essential for odor control during storage. Replace the filter if it has been in use for more than six months, as recommended by the manufacturers of both the Epica and Utopia bins. The new filter will continue to adsorb volatile compounds that might otherwise escape.
When a replacement is not immediately available, seal the existing filter in an airtight zip‑lock bag with a small amount of baking soda to preserve its effectiveness.
For electric models, the carbon filter is often located in the lid assembly. Ensure it is securely seated before sealing the unit.
Step 5: Seal the Lid Securely
After the bin is dry and the filter is in place, close the lid tightly. Many countertop composters feature an airtight sealing mechanism; the Epica bin uses a snap‑fit lid that creates a vacuum seal when pressed firmly.
To add an extra layer of protection, wrap the closed bin in a stretch‑film or place it inside a large zip‑lock bag. This double‑seal prevents accidental opening during transport and reduces the chance of insects entering.
If the bin has a removable lid, consider taping the hinge with painter's tape to keep it from shifting.
Step 6: Pack the Bin in a Protective Container
Choose a sturdy cardboard box or a reusable plastic storage bin that is slightly larger than the compost bin. Line the bottom with a layer of newspaper or a thin towel to cushion the unit.
Place the sealed compost bin upright, then fill any remaining space with packing peanuts, crumpled paper, or additional silica gel packets. This prevents movement that could damage the lid or internal components.
For electric composters such as the Ouaken 4L Electric Kitchen Composter, remove the power cord and wrap it separately to avoid strain on the connector.
Step 7: Store in a Cool, Dry Location
The final storage environment should be temperature‑controlled, ideally between 50°F and 75°F (10°C‑24°C). A closet, spare bedroom, or garage with a dehumidifier works well.
Avoid direct sunlight, as heat can reactivate any residual organic matter and cause the charcoal filter to release trapped odors. If the storage area is prone to humidity, place an additional desiccant packet inside the outer container.
Label the box with the date of storage and a brief reminder to inspect the bin before reuse. This practice helps maintain a clear inventory of household appliances during travel.
Tips & Pro Tips
- Inspect before sealing: Look for any cracks or rust on the stainless‑steel body. Even minor damage can compromise the airtight seal.
- Use fresh charcoal filters: Both the Epica and Utopia bins recommend filter replacement every 3–6 months. A new filter ensures optimal odor absorption during the long idle period.
- Consider a backup bin: If you own both a manual bin and an electric model, store the manual bin and bring the electric unit on the trip for occasional use, provided power is available.
- Document the process: Take a quick photo of the cleaned and sealed bin. This visual reference helps verify that all steps were completed correctly.
- Prevent pest entry: Sprinkle a thin layer of diatomaceous earth around the storage box; it deters crawling insects without harming the bin.
Troubleshooting
| Problem | Possible Cause | Solution |
|---|---|---|
| Odor after opening | Residual moisture or old charcoal filter | Re‑dry the bin, replace the filter, and allow additional airing time before resealing. |
| Leakage from the lid | Lid not fully engaged or damaged seal | Check the snap‑fit mechanism, clean the gasket, and reseat the lid firmly. |
| Pest presence inside storage box | Insufficient sealing or open gaps | Re‑wrap the bin in a zip‑lock bag, add more silica gel, and ensure the outer container is tightly closed. |
Conclusion
Storing a countertop compost bin for an extended trip does not have to be daunting. By emptying, cleaning, drying, sealing, and protecting the unit with the right accessories, one can travel with confidence that the compost system will remain odor‑free and pest‑proof.
The steps outlined above leverage the built‑in features of popular models such as the Epica Kitchen Compost Bin, Utopia Kitchen Compost Bin, and electric options like the Airthereal R500 Electric Composter. Applying these practices ensures the bin is ready for immediate use upon return, supporting a sustainable lifestyle without interruption.
Remember to inspect the bin before the next composting cycle, replace the charcoal filter if needed, and enjoy the peace of mind that comes from a well‑maintained composting system.
Products Mentioned in This Guide
Frequently Asked Questions
How should I empty a countertop compost bin before a long trip?
Scoop out all solid waste, rinse the bin with water, and let it air‑dry completely to prevent mold.
Is it necessary to seal the compost bin during travel?
Yes, cover the bin with an airtight lid or plastic wrap to stop odors and keep pests out.
Can I store the compost bin in the refrigerator while away?
Storing in the fridge slows decomposition and reduces odor, but be sure the bin is sealed and the fridge is set to a low temperature.
What tools help keep the bin pest‑proof during storage?
Use a tight‑fitting lid, silicone sealant around the edges, and place the bin inside a sealed plastic container.
How long can a dried, sealed compost bin stay unused without problems?
If fully dried and sealed, it can remain safe for several weeks to a few months, but check for moisture before reuse.