How to Calibrate Low‑Cost Sensors for Your Countertop Composter: DIY Step‑by‑Step Guide to Accurate Temperature & Moisture Readings
Introduction
One will discover how to obtain reliable temperature and humidity data from inexpensive sensors, a capability that directly influences the speed and quality of composting. Accurate readings enable the user to maintain the optimal moisture range of 50‑60% and temperature range of 120‑150°F, conditions that accelerate microbial activity. This guide explains the scientific basis of calibration, demonstrates practical techniques, and recommends tools that simplify each stage. By following the instructions, the reader will transform a basic countertop composter into a data‑driven system without incurring significant expense.
What You Will Need
- One TempPro TP50 Digital Hygrometer – $10.49, rating 4.6/5 (154,372 reviews)
- One DROK 10K NTC Waterproof Temp Probe 1m (3‑pack) – $6.99, rating 4.6/5 (855 reviews)
- One Govee WiFi Smart Hygrometer Thermometer (2‑pack) – $62.99, rating 4.3/5 (7,762 reviews)
- Standard kitchen thermometer (for reference), ice, distilled water, a small pot, and a set of saturated salt solutions (magnesium chloride, sodium chloride, potassium nitrate)
- Microcontroller or data logger capable of reading NTC resistance (Arduino, ESP32, or similar)
- Electrical tape, zip ties, and a small screwdriver
Step‑by‑Step Instructions
Step 1: Prepare the Composting Chamber
The first step is to ensure that the countertop composter is clean, stable, and has a clear opening for sensor placement. One should remove any debris that could interfere with sensor contact, and verify that the lid seals tightly when closed. A stable base prevents vibration that could affect sensor readings during calibration. Finally, mark two locations inside the chamber – one for temperature measurement near the centre, and one for humidity measurement on the side wall.
Step 2: Install the Temperature Probe
One will connect the DROK 10K NTC Waterproof Temp Probe 1m (3‑pack) to the microcontroller. The probe features a stainless‑steel waterproof housing that resists corrosion from compost leachate, and a 1‑meter lead that reaches the centre of the compost without crowding the interior. The NTC thermistor offers a measurement range of –25°C to 125°C (‑13°F to 257°F) with an accuracy of ±1%, which is sufficient for composting temperatures. Connect the two‑pin JST XH2.54mm plug to the analog input of the microcontroller, secure the connection with electrical tape, and route the cable along the outer wall using zip ties.
Why this probe is useful: its waterproof design prevents short‑circuiting when moisture accumulates, and its narrow diameter (5 × 25 mm) allows insertion without creating large holes that could disrupt airflow. The included three‑pack provides redundancy; one probe can serve as a backup if the primary sensor drifts over time.
Step 3: Install the Humidity Sensor
The TempPro TP50 Digital Hygrometer will act as the primary humidity monitor. This device displays a wellness indicator (DRY, COMFORT, WET) and records high/low values, features that help the user track long‑term trends. Place the hygrometer on the side wall of the compost chamber using its magnetic back; the magnet holds the unit securely while allowing easy removal for cleaning. Set the unit to the desired temperature scale (°F or °C) and insert a fresh AAA battery, which is included.
Why this hygrometer is useful: it offers a refresh rate of every 10 seconds, providing near‑real‑time feedback, and its accuracy of ±2‑3%RH is adequate for the target moisture range. The dual‑display of temperature and humidity reduces the need for separate devices, simplifying the wiring layout.
Step 4: Connect Sensors to a Data Logger
One should program the microcontroller to read the resistance of the DROK NTC probe and convert it to temperature using the Steinhart‑Hart equation. Sample code is widely available for Arduino and ESP32 platforms. The hygrometer can be left as a standalone display, but for data logging it is advisable to pair it with the Govee WiFi Smart Hygrometer Thermometer as a reference device. The Govee units communicate via WiFi and Bluetooth, storing up to two years of historical data, which provides a benchmark for calibration verification.
Why the Govee pair is useful: the Swiss‑made sensor delivers temperature accuracy of ±0.54°F (±0.3°C) and humidity accuracy of ±3%RH, surpassing the baseline sensors. The ability to export data allows the user to compare readings over weeks, identifying systematic drift.
Step 5: Calibrate the Temperature Probe Using Ice‑Water and Boiling‑Water Baths
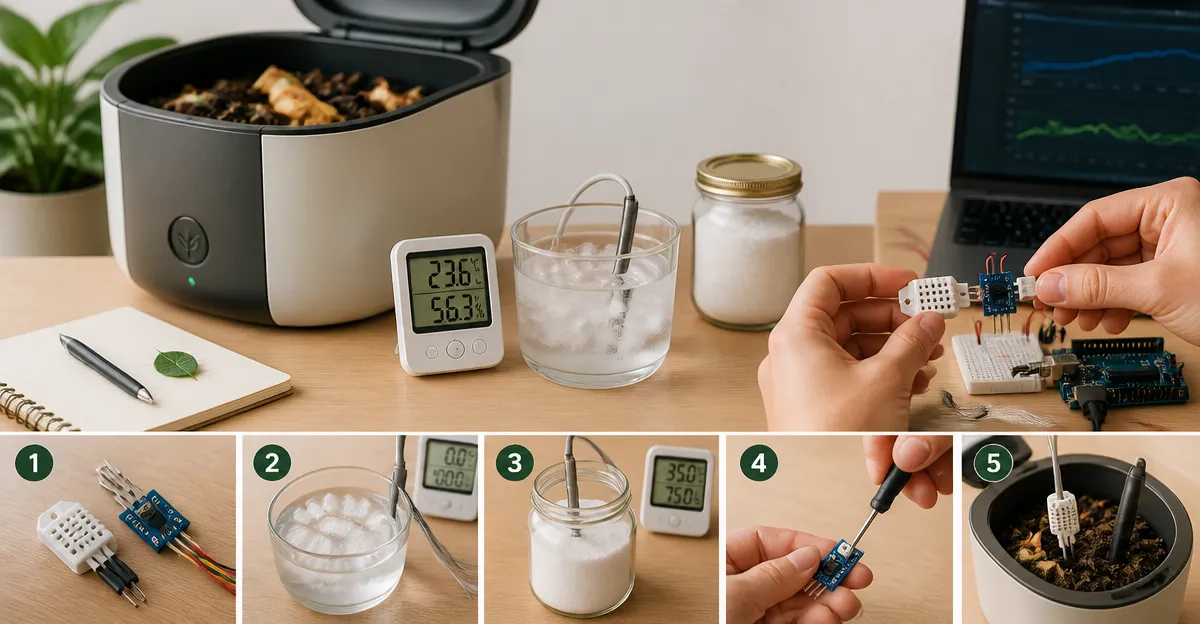
- Fill a small glass container with crushed ice and add enough distilled water to create a slushy mixture. Stir until the temperature stabilises at 0°C (32°F). Insert the DROK probe into the ice‑water bath, ensuring the sensor tip is fully submerged but not touching the container walls.
- Record the raw analog value reported by the microcontroller. Adjust the conversion factor in the firmware so that the displayed temperature reads exactly 0°C.
- Next, bring a pot of distilled water to a rolling boil. Verify the boiling point is 100°C (212°F) at sea level; adjust for altitude if necessary. Submerge the probe in the boiling water, avoiding steam contact with the connector.
- Record the new raw value and modify the firmware slope so that the displayed temperature reads 100°C. The two‑point calibration (0°C and 100°C) linearises the sensor response across the composting range.
Why two‑point calibration is important: it compensates for sensor tolerances and ensures that the temperature readings are accurate throughout the critical range of 50°C to 65°C, where most composting microbes are most active.
Step 6: Calibrate the Humidity Sensor Using Saturated Salt Solutions
One will prepare three sealed containers, each containing a saturated solution of a known salt. The equilibrium relative humidity (RH) of each solution is well documented:
- Magnesium chloride – approximately 33% RH
- Sodium chloride – approximately 75% RH
- Potassium nitrate – approximately 93% RH
Place a small dish of the solution inside each container, insert the TempPro hygrometer, and seal the lid. Allow the sensor to stabilise for at least two hours. Record the displayed RH and compare it to the theoretical value. Adjust the hygrometer’s internal calibration offset (if the device provides a menu option) or note the deviation for manual correction in the data logger.
Why saturated salt solutions are ideal: they provide stable, reproducible humidity levels without the need for expensive calibration chambers. Using three points across the humidity spectrum improves the linearity of the sensor’s response, which is crucial for maintaining the 50‑60% target range in compost.
Step 7: Validate Calibration with the Govee Reference Units
Place one of the Govee WiFi Smart Hygrometer Thermometer units inside the compost chamber alongside the calibrated sensors. Allow all devices to run for a full 24‑hour cycle. Export the data from the Govee app and compare the temperature and humidity curves to those recorded by the DROK probe and TempPro hygrometer.
If the deviation exceeds ±1°C for temperature or ±5%RH for humidity, revisit the calibration steps and fine‑tune the offsets. Consistent alignment between the reference unit and the low‑cost sensors confirms successful calibration.
Tips & Pro Tips
- Mount the temperature probe at the geometric centre of the compost mass; this location experiences the least temperature gradient.
- Use a small piece of foam or silicone to cushion the hygrometer against direct contact with compost particles, which can cause false high‑humidity readings.
- Periodically replace the AAA battery in the TempPro hygrometer to avoid drift caused by low voltage.
- When calibrating with boiling water, consider the local atmospheric pressure; at higher elevations, water boils below 100°C, requiring an adjustment factor.
- Log calibration dates in a notebook; sensor characteristics can shift after several months of exposure to acidic compost environments.
Troubleshooting
| Problem | Possible Cause | Solution |
|---|---|---|
| Temperature readings remain constant | Probe not connected or broken wire | Inspect the JST connector, reseat it, and verify continuity with a multimeter. |
| Humidity spikes after each compost addition | Sensor exposed to direct moisture | Re‑position the hygrometer behind a protective screen while maintaining airflow. |
| Large discrepancy between hygrometer and Govee unit | Calibration offset not applied | Re‑run the saturated‑salt calibration and record the exact offset values. |
Conclusion
One has learned how to install, calibrate, and validate low‑cost temperature and humidity sensors for a countertop composting system. By employing the DROK NTC probe, the TempPro TP50 Digital Hygrometer, and the Govee WiFi Smart Hygrometer as a reference, the user can achieve temperature accuracy within ±1°C and humidity accuracy within ±5%RH. Accurate data empowers the user to adjust aeration, moisture, and feedstock composition, thereby accelerating the composting process and reducing odour. The methods described are repeatable and inexpensive, enabling anyone to transform a simple kitchen compost bin into a scientifically monitored system.
Products Mentioned in This Guide
Frequently Asked Questions
Why is sensor calibration important for a countertop composter?
Calibration ensures temperature and moisture readings are accurate, which keeps the compost within the optimal 120‑150°F and 50‑60% moisture range for fast microbial activity.
What low‑cost sensors are recommended for calibrating temperature and humidity?
The guide recommends the TempPro TP50 Digital Hygrometer and the DROK 10K NTC Waterproof Temp Probe (3‑pack) as affordable, reliable options.
How can I verify the accuracy of my calibrated sensor?
Compare the sensor’s readings against a known‑reference device or a calibrated thermometer/hygrometer and adjust the sensor’s offset until they match.
Do I need any special tools to calibrate the sensors?
A stable heat source (like a water bath), a calibrated reference thermometer, and a small container for humidity control are sufficient for DIY calibration.
How often should I recalibrate my composter sensors?
Recalibrate every 3‑6 months or after any sensor relocation or exposure to extreme conditions to maintain reliable data.