How to Build an Easy, Odor‑Free DIY Countertop Composter for Apartments — Small‑Space Indoor Composting Guide
Introduction
The modern apartment dweller often faces the dilemma of reducing food waste while maintaining a pleasant indoor environment. This guide explains how to construct a compact, odor‑free composting system that fits on a kitchen countertop or under a cabinet. One will learn how to select the right container, integrate ventilation, and adopt maintenance habits that prevent unpleasant smells. By following these steps, the reader will be able to divert organic scraps from the landfill and contribute to a more sustainable household.
What You'll Need
- A slim, countertop‑compatible compost bin (see product recommendations below).
- Adjustable vent or charcoal filter to control odor.
- Mounting hardware if the bin will be attached to a cabinet door.
- Reusable compostable liners or a small trash bag for easy emptying.
- Basic cleaning supplies such as warm soapy water and a soft cloth.
All of the above items are readily available on Amazon and can be acquired without extensive research.
Step‑by‑Step Instructions
Step 1: Choose the Ideal Location
Identify a spot on the countertop that receives indirect light and is within arm’s reach of the cooking area. The location should allow the bin to be opened easily while preventing accidental spills onto the sink. For apartments with limited cabinet space, consider mounting the bin on the inside of a cabinet door to keep the countertop clear. This placement also protects the bin from direct heat, which can accelerate decomposition and increase odor.
Step 2: Select a Suitable Compost Bin
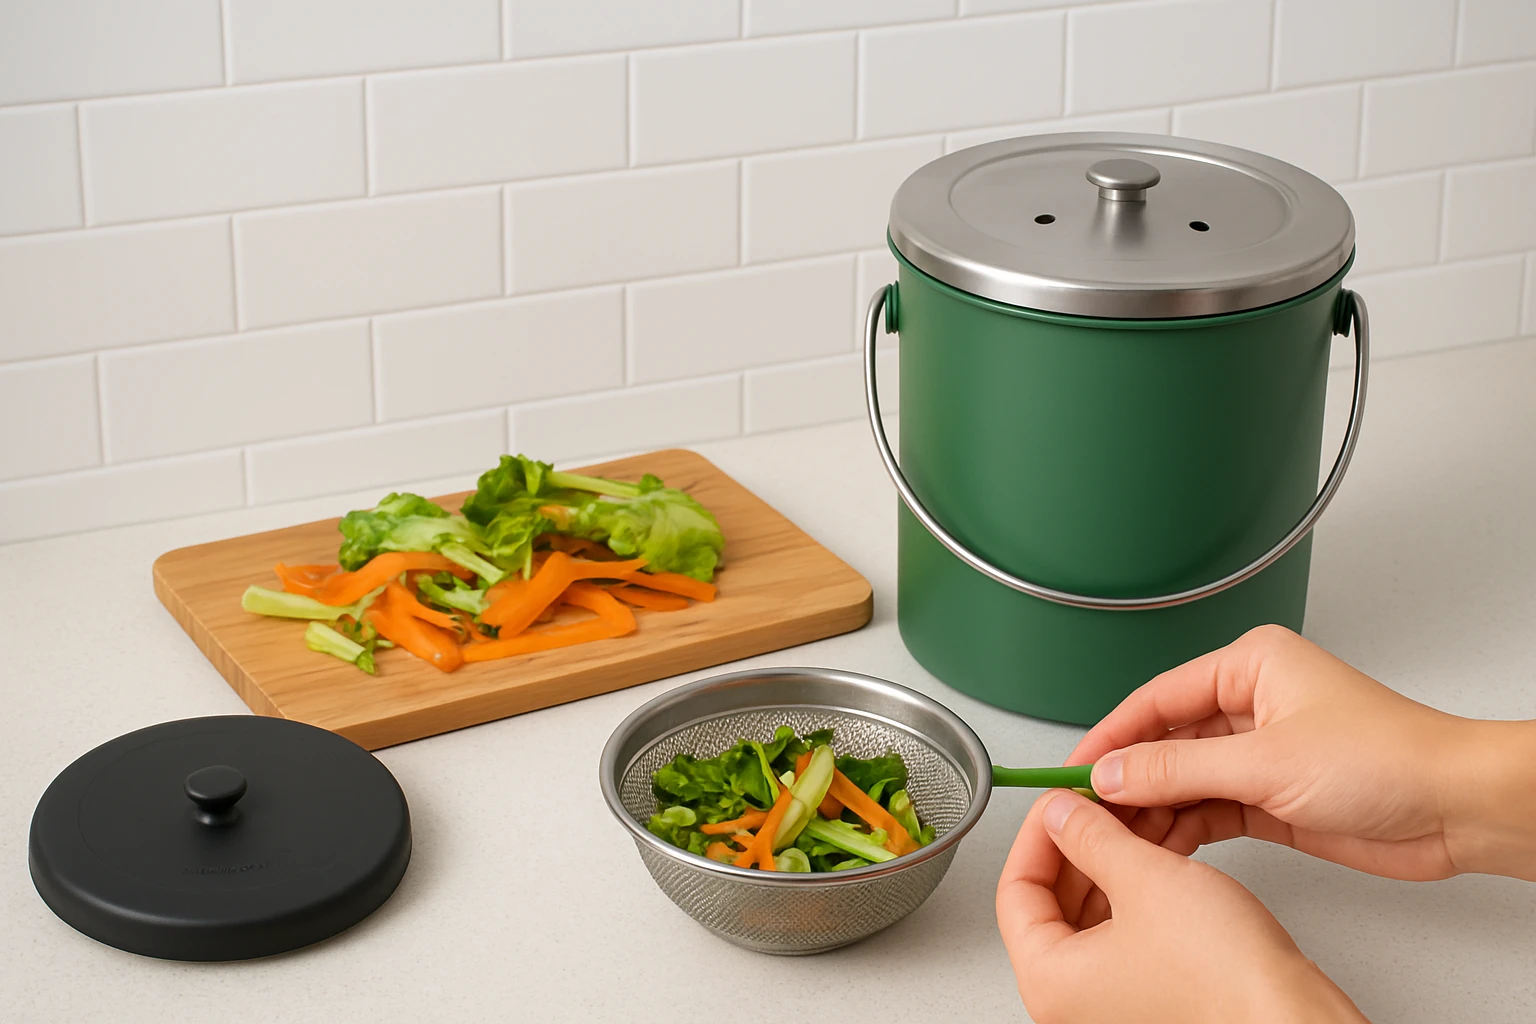
For most single‑person or couple households, a one‑gallon capacity provides a balance between volume and manageability. The Joseph Joseph Compo 4 Compost Bin offers a slimline design, a flip‑up lid, and an adjustable air vent that can be opened to release moisture or closed to block insects. It is priced at $20.00 and holds a rating of 4.6 out of 5 stars based on 5,023 reviews. Its built‑in mounting bracket allows secure attachment to a cabinet door, making it an excellent choice for space‑constrained kitchens.
Alternatively, the Utopia Kitchen Stainless Steel Compost Bin provides a slightly larger capacity of 1.3 gallons and a stainless‑steel body that resists scratches and cracks. Priced at $22.79 with a rating of 4.5 out of 5 stars from 19,835 reviews, this bin includes a charcoal filter that naturally traps odors. The sleek silver finish complements modern décor and can sit on the countertop without additional mounting.
Both bins are designed to be emptied weekly, which prevents the buildup of strong smells. Choose the model that best matches the available space and aesthetic preferences.
Step 3: Install Adjustable Ventilation
The Joseph Joseph bin features an integrated vent that can be rotated to open or close. Position the vent toward the top of the lid and set it to the open position during the first few days of use to allow excess moisture to escape. After the bin is consistently dry, close the vent to minimize airflow that could carry odors to the surrounding area. If using the Utopia Kitchen bin, insert the supplied charcoal filter beneath the lid; the filter’s activated carbon absorbs volatile compounds that cause unpleasant smells.
For added control, a small piece of charcoal sheet can be affixed directly under the vent using double‑sided tape. This method is inexpensive and can be replaced every two months to maintain optimal performance.
Step 4: Secure the Bin to a Cabinet Door (Optional)
If countertop space is at a premium, mount the chosen bin on the interior of a cabinet door. The Joseph Joseph bin includes a bracket and a set of small screws. For cabinets with thicker doors, replace the supplied screws with longer wood screws, a washer, a lock washer, and a nut to ensure a robust connection. Drill pilot holes to avoid splitting the wood, then attach the bracket securely.
When the bin is mounted high on the door, the handle remains accessible, and the space below the bin stays free for other kitchen tools. Ensure the bin closes fully when the cabinet door is shut; if necessary, adjust the bracket position to avoid interference.
Step 5: Prepare the Bin for Use
Line the interior of the bin with a reusable compostable liner or a thin trash bag that can be lifted out for emptying. The liner prevents direct contact with the bin’s surface, making cleaning easier and protecting the finish from stains. Place a small piece of kitchen paper at the bottom to absorb excess liquid.
Begin adding fruit peels, vegetable trimmings, coffee grounds, and tea bags. Avoid adding meat, dairy, or oily foods, as these accelerate odor development. Chop larger pieces into bite‑size fragments to speed up decomposition and reduce the likelihood of foul smells.
Step 6: Maintain a Healthy Compost Cycle
Balance green (nitrogen‑rich) and brown (carbon‑rich) materials. For every cup of vegetable scraps, add a tablespoon of shredded newspaper or cardboard. This ratio maintains aerobic conditions, which are essential for odor‑free composting. Stir the contents gently once a week using a small kitchen spoon or the bin’s handle to introduce oxygen.
Empty the bin into a larger outdoor compost pile or municipal green‑waste bin when it reaches capacity, typically after five to seven days for a two‑person household. Rinse the bin with warm soapy water, wipe dry, and replace the liner before the next use.
Tips & Pro Tips
- Place a small piece of activated charcoal under the vent to further neutralize odors.
- Keep the bin away from direct sunlight to prevent rapid heating, which can cause condensation and smell.
- Use a kitchen scale to measure the amount of food waste; a consistent load helps maintain a predictable emptying schedule.
- If the bin begins to emit a strong odor, check for excess moisture and add more brown material to absorb it.
Troubleshooting
| Problem | Possible Cause | Solution |
|---|---|---|
| Strong odor despite closed lid | Insufficient ventilation or excess moisture | Open the vent for a few hours, add shredded newspaper, and ensure the liner is not saturated. |
| Bin feels heavy to lift | Large volume of wet waste | Empty the bin more frequently, and spread waste over multiple days. |
| Screws loosening on cabinet mount | Thin cabinet material or inadequate hardware | Replace the supplied screws with longer wood screws and use a lock washer for added security. |
Conclusion
By following this guide, one can create a compact, odor‑free composting system that fits comfortably in an apartment kitchen. The selected bins provide reliable ventilation, durable construction, and aesthetic appeal, while proper maintenance ensures that the compost remains a beneficial rather than a burdensome addition. Implementing these practices reduces household waste, supports local compost programs, and contributes to a greener environment.
Products Mentioned in This Guide
Frequently Asked Questions
What size bin is ideal for a countertop composter in a small apartment?
Choose a slim bin of 2‑3 L capacity that fits on a kitchen counter or under a cabinet without taking up much space.
How can I prevent odors in a DIY countertop composter?
Use an adjustable vent or charcoal filter and add carbon‑rich materials like shredded newspaper to balance moisture.
Which kitchen scraps are safe to add to an indoor compost bin?
Add fruit and vegetable peels, coffee grounds, and tea bags, while avoiding meat, dairy, and oily foods that can cause smells.
Do I need a special liner for a countertop composter?
A reusable compostable liner or a small trash bag makes emptying easy and keeps the bin clean.
How often should I stir or aerate the compost to keep it odor‑free?
Stir the contents once every 1‑2 days to introduce air, which speeds decomposition and reduces foul odors.