How to Create an Indoor Composter Odor Testing Protocol: Step‑by‑Step DIY Methods to Measure, Diagnose, and Eliminate Smells
Introduction
One of the most common concerns for urban gardeners is the unpleasant smell that can emanate from an indoor compost bin. This guide explains how to develop a systematic odor‑testing protocol, allowing one to identify the source of foul aromas, measure their intensity, and apply corrective actions. By following the procedures outlined here, the reader will gain confidence in maintaining a healthy, odor‑free compost system while preserving the nutritional benefits of kitchen waste recycling. The approach combines simple scientific methods with practical tools, ensuring that both novice and experienced indoor gardeners can achieve reliable results without expensive laboratory equipment.
What You’ll Need
- Digital kitchen scale (minimum 0‑500 g capacity)
- pH test strips or a handheld pH meter
- Thermometer capable of measuring 0‑50 °C
- Odor intensity chart (provided in the guide)
- Sealable glass jars (250 ml) for sample containment
- Disposable gloves and a face mask for safety
- Notebook or digital app for recording data
- Year‑Round Indoor Salad Gardening – reference book for soil‑sprouted greens and odor management
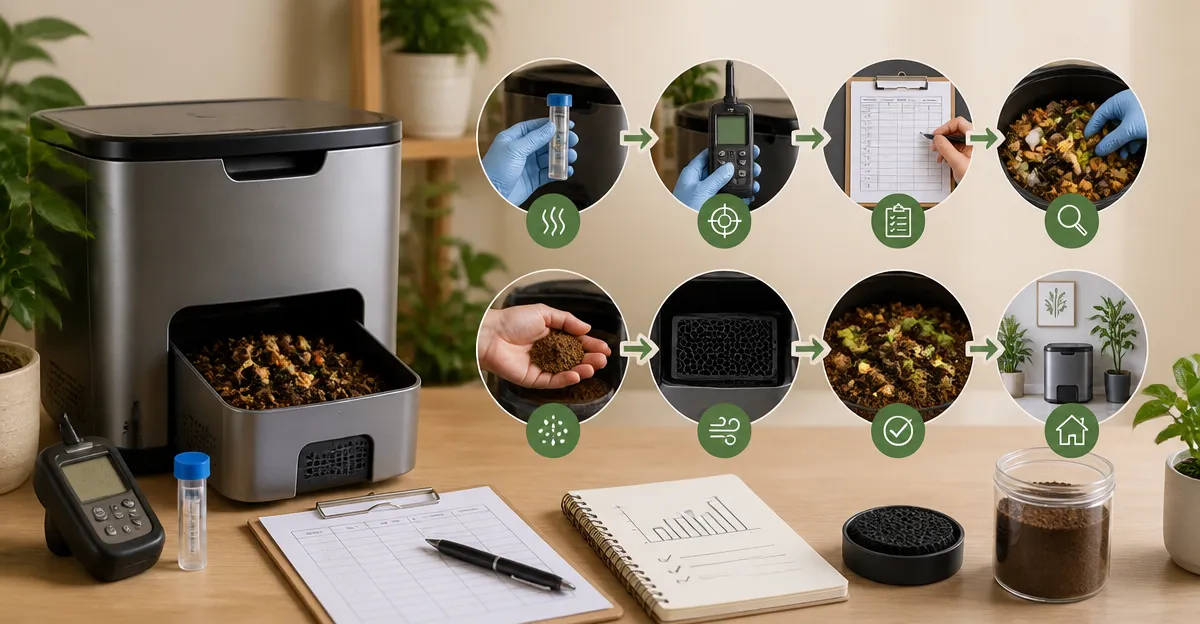
Step 1: Establish a Baseline Measurement
Before any troubleshooting begins, one must understand the normal odor profile of a healthy indoor compost. Place a 100 g sample of fresh kitchen scraps into a sealed 250 ml glass jar. Allow the jar to sit for 30 minutes at room temperature, then open it and assess the smell using the odor intensity chart. Record the rating (0 = no odor, 10 = extremely strong). This baseline will serve as a reference point for future comparisons.
The reference book Year‑Round Indoor Salad Gardening provides detailed guidance on the types of organic matter that produce minimal odors when properly aerated. Its price of $15.32 and rating of 4.7/5 from 478 reviewers indicate that it is a trusted resource for indoor growers seeking low‑odor compost practices.
Step 2: Monitor Temperature and Moisture
Temperature spikes above 45 °C often signal anaerobic activity, which generates foul‑smelling compounds such as hydrogen sulfide. Insert the thermometer into the center of the compost pile and record the reading twice daily for one week. Simultaneously, use the kitchen scale to weigh the compost before and after adding water; aim for a moisture content of 55‑65 % by weight.
Maintaining proper moisture reduces the likelihood of odor‑producing anaerobic pockets. If the temperature consistently exceeds the target range, increase aeration by gently stirring the compost with a clean garden fork.
Step 3: Test pH Levels
Acidic conditions (pH below 5.5) can accelerate the breakdown of protein‑rich scraps, releasing volatile amines. Use pH test strips to dip into a small compost slurry (mix equal parts compost and distilled water). Compare the strip color to the chart and note the pH value. If the reading is below the optimal range of 6.0‑7.5, add a thin layer of shredded newspaper or cardboard to buffer acidity.
Recording pH trends alongside temperature and moisture data creates a comprehensive dataset that helps pinpoint the root cause of odors.
Step 4: Conduct Odor Sampling with Sealed Jars
To quantify odor over time, repeat the sampling procedure from Step 1 at three distinct locations within the bin: top, middle, and bottom. Place each 100 g sample in a separate sealed jar, wait 30 minutes, and rate the intensity. Compare the three scores; a significantly higher rating at the bottom often indicates insufficient airflow.
When a strong odor is detected, open the bin briefly, stir the contents, and add a thin layer of dry carbon‑rich material such as shredded paper. This practice increases oxygen diffusion and absorbs volatile compounds.
Step 5: Implement Preventive Design Adjustments
Physical design influences odor control. Ensure the compost container has a lid with adjustable vents to regulate airflow. If the bin is located near a living space, consider placing it inside a decorative enclosure that does not trap smells. The Cozy White Cottage model, while primarily a decorative piece, can serve as an aesthetic housing for the compost bin, providing visual appeal while allowing vent installation.
The Cottage is priced at $0.00 (no price listed) and holds a perfect 5/5 rating, indicating high customer satisfaction for its visual charm. Using such an enclosure helps integrate the compost system into interior décor without compromising ventilation.
Step 6: Review Data and Adjust Routine
After two weeks of systematic monitoring, compile all recorded data into a simple table. Identify patterns such as recurring high temperature spikes or low pH readings. Adjust the feeding schedule by reducing meat and dairy inputs, which are common odor contributors. Increase the frequency of turning the compost to three times per week if anaerobic pockets persist.
Finally, re‑run the baseline odor test. A successful protocol will show a reduction of at least two points on the odor intensity chart compared to the initial measurement.
Tips & Pro Tips
- Use a kitchen scale for precise portion control; even small variations in moisture can affect microbial activity.
- When adding water, spray mist rather than pouring to avoid over‑saturation.
- Incorporate a thin layer of aged compost from an outdoor system to inoculate beneficial aerobic microbes.
- Store the odor intensity chart in a waterproof sleeve for easy reference.
- For advanced users, a handheld CO₂ meter can detect elevated carbon dioxide levels, another sign of anaerobic conditions.
Troubleshooting
| Problem | Possible Cause | Solution |
|---|---|---|
| Persistent foul smell despite turning | Excessive protein or dairy waste | Reduce or eliminate meat, cheese, and eggs from feedstock. |
| Odor spikes after adding citrus peels | Acidic compounds increase acidity | Balance with extra shredded newspaper and monitor pH. |
| Dry, crumbly compost | Insufficient moisture | Lightly mist with water and re‑measure moisture content. |
Conclusion
By establishing a baseline, monitoring temperature, moisture, and pH, and employing systematic odor sampling, one can create a reliable indoor compost odor testing protocol. The data‑driven adjustments outlined in this guide empower the reader to diagnose problems quickly and implement effective solutions, resulting in a thriving compost system that remains invisible to the nose. Incorporating recommended tools such as the Year‑Round Indoor Salad Gardening book and, where appropriate, the Cozy White Cottage enclosure, further enhances the user experience. Consistent record‑keeping and periodic review ensure long‑term success and a pleasant indoor environment.
Products Mentioned in This Guide
Frequently Asked Questions
What are the essential tools for an indoor compost odor testing protocol?
You need a digital kitchen scale, pH test strips or meter, a thermometer (0‑50 °C), an odor intensity chart, 250 ml sealable glass jars, disposable gloves, and a face mask.
How do I measure odor intensity in a compost bin?
Place a small sample of compost in a sealed jar, wait a few minutes, then compare the perceived smell to the provided odor intensity chart.
What pH range indicates a healthy indoor compost?
A pH between 6.0 and 7.5 is ideal; values outside this range may cause strong odors and slow decomposition.
Why is temperature monitoring important for odor control?
Maintaining 35‑45 °C promotes active microbial activity and reduces foul smells, while temperatures below 20 °C can cause odor‑producing anaerobic conditions.
How often should I perform odor testing on my indoor compost?
Conduct the test weekly during active composting and after adding new kitchen waste to catch any odor spikes early.