How to Grow Oyster Mushrooms Indoors Using Processed Food Waste: A Step‑by‑Step DIY Guide
Introduction
One will learn how to transform everyday food scraps into a sustainable substrate for oyster mushroom production. This guide explains why oyster mushrooms are an excellent choice for indoor cultivation, highlighting their rapid growth cycle and nutritional benefits. Readers will understand the environmental value of diverting food waste from landfill and converting it into a gourmet protein source. By the end of the article, one will possess a complete workflow from waste preparation to harvest.
What You Will Need
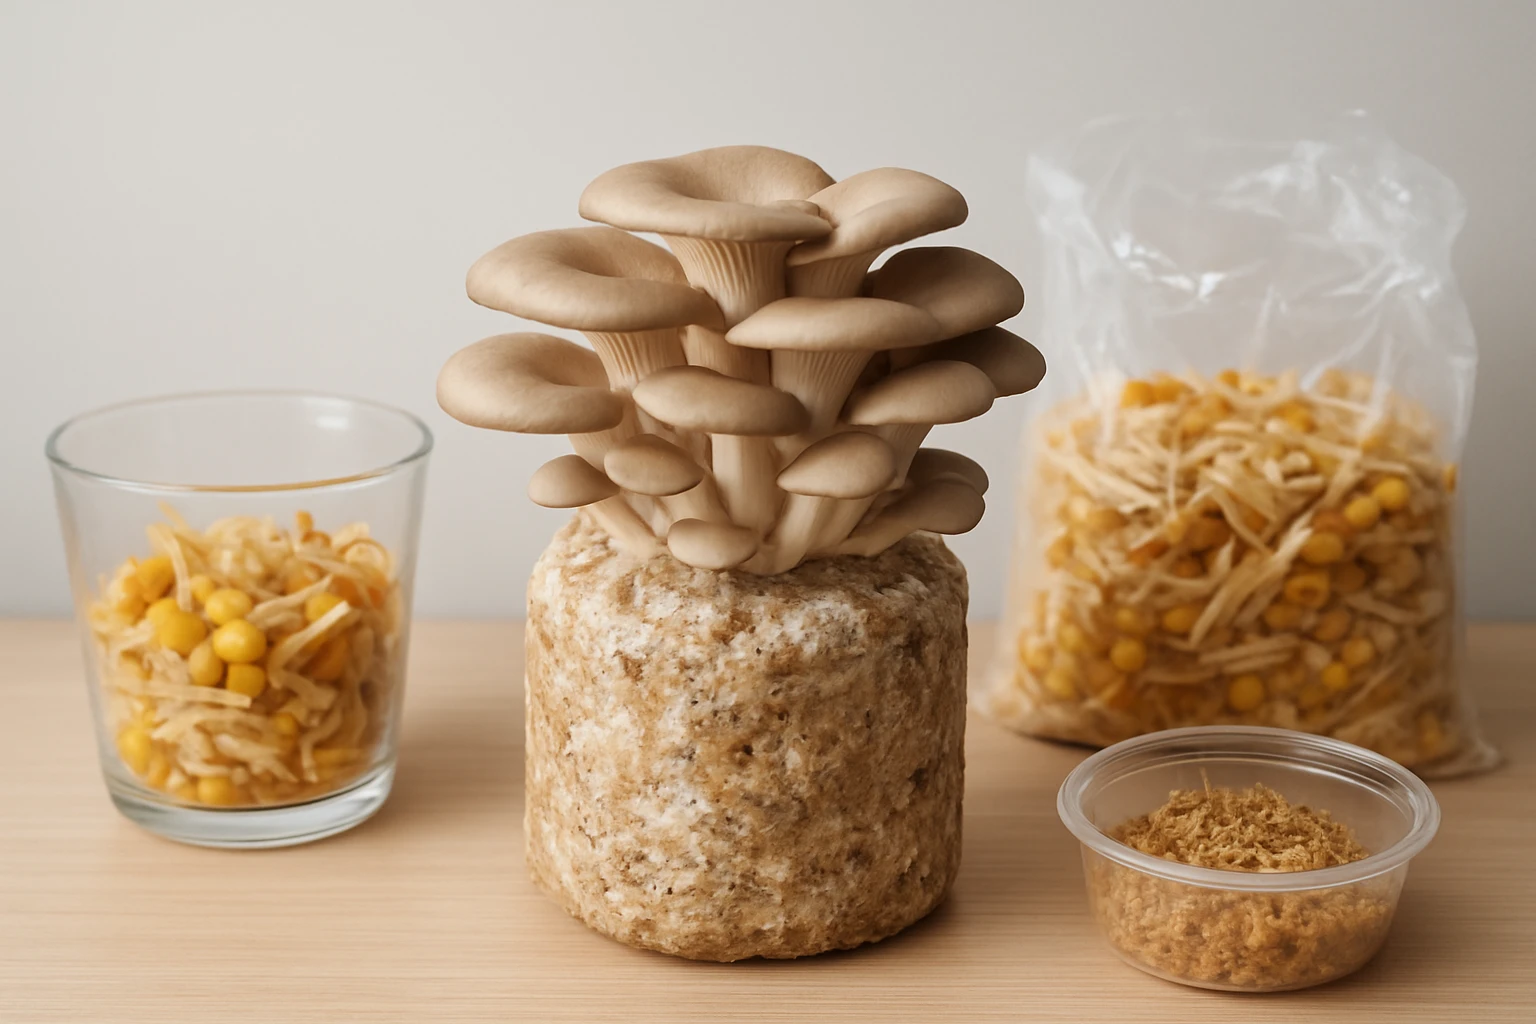
- Processed food waste (vegetable peels, coffee grounds, shredded cardboard)
- Water source for moisture control
- Spray bottle or mister for misting
- Thermometer to monitor temperature
- Clean workspace with good ventilation
- One of the following mushroom kits for spawn: NuBlume Blue Oyster Kit, Forest Origins Brown Oyster Kit, or Back to the Roots Mini Mushroom Kit
- Plastic container or tote with a lid for incubation
- Optional: humidity tent made from clear plastic sheeting
Step 1: Prepare the Substrate
The first major step is to create a nutritious substrate from processed food waste. Collect vegetable peels, fruit skins, coffee grounds, and shredded cardboard; these materials provide lignocellulose that oyster mushrooms can break down. Chop the solids into pieces no larger than two centimeters to increase surface area, then soak the mixture in hot water (approximately 70 °C) for fifteen minutes to soften fibers. After soaking, drain excess water and spread the substrate on a clean tray to allow it to cool to room temperature before inoculation.
Step 2: Pasteurize the Substrate
Pasteurization eliminates competing microbes while preserving beneficial nutrients. Place the cooled substrate in a large pot, add enough water to cover, and maintain a temperature of 65‑70 °C for one hour. Use a kitchen thermometer to verify the temperature; avoid boiling, which can degrade essential nutrients. Once the time has elapsed, drain the substrate thoroughly and return it to the tray, ensuring it is moist but not water‑logged.
Step 3: Inoculate with Mushroom Spawn
Inoculation introduces the fungal mycelium that will colonize the substrate. For beginners, the NuBlume Blue Oyster Kit offers a pre‑colonized block that can be broken into small pieces and mixed directly into the substrate. The kit is priced at $24.99, carries a rating of 4.1 out of 5 from 324 reviews, and is marketed as ready‑to‑fruit upon arrival, eliminating the need for separate spawn preparation. If one prefers a different species, the Forest Origins Brown Oyster Kit provides brown oyster spawn; it costs $28.99, also holds a 4.1 rating from 333 reviews, and is handmade in California, offering a slightly earthier flavor profile. For a compact trial, the Back to the Roots Mini Mushroom Kit supplies a small block of spawn at $14.97 with a 4.1 rating from 9,588 reviews, making it ideal for limited space or classroom demonstrations. Break the spawn block into roughly one‑centimeter fragments and distribute evenly throughout the substrate, then gently press the mixture to ensure good contact.
Step 4: Incubate the Colonized Substrate
Incubation allows the mycelium to spread and fully colonize the waste substrate. Transfer the inoculated substrate into a plastic container with a loose‑fitting lid to maintain humidity while allowing gas exchange. Place the container in a dark area with a stable temperature of 20‑24 °C; this range promotes rapid mycelial growth for oyster species. Monitor the substrate daily; after three to five days a white network of mycelium should become visible, and full colonization typically occurs within two weeks. Maintaining a relative humidity of 85‑95 % by misting the container walls with a spray bottle helps prevent the substrate from drying out.
Step 5: Initiate Fruiting
Once the substrate is fully colonized, it is time to trigger fruiting. Introduce fresh air and indirect light by moving the container to a well‑lit room with a window that receives filtered sunlight for twelve hours per day. Reduce the temperature slightly to 18‑20 °C to signal the mycelium that it is time to produce mushrooms. Increase humidity by placing a shallow tray of water nearby or by covering the container with a clear plastic tent, ensuring the interior does not become water‑logged. Within five to ten days pinning—tiny mushroom buds—will appear, followed by rapid growth of full‑size oyster mushrooms.
Step 6: Harvest the Mushrooms
Harvesting should be performed when the caps have fully expanded but before the edges begin to curl upward. Gently twist or cut the mushroom at the base of the stem to avoid damaging the underlying mycelium. One can expect a first flush yielding six to twelve ounces of blue oysters from the NuBlume kit, up to one pound total from successive flushes, while the Brown Oyster kit typically provides a comparable amount with a richer flavor. The Mini Kit can produce two harvest cycles, each offering three to four servings. After harvesting, continue to maintain humidity and temperature; additional flushes may appear within a week.
Tips & Pro Tips
- Maintain consistent moisture; over‑watering can cause bacterial contamination, while under‑watering stalls mycelial growth.
- Use a hygrometer to track relative humidity; ideal levels are 85‑95 % during incubation and 90‑95 % during fruiting.
- If space permits, create a multi‑layer shelf system to increase production without expanding the footprint.
- Rotate the container every two days to ensure even colonization and fruiting across the substrate.
- For enhanced flavor, add a handful of coffee grounds to the substrate during preparation; the nitrogen content supports robust growth.
Troubleshooting
Problem: Substrate dries out and mycelium stops growing.
Solution: Increase misting frequency and ensure the container lid is not sealed tightly; a small opening for airflow prevents excessive dehydration.
Problem: Contamination with green mold appears.
Solution: Remove the contaminated portion immediately, sterilize tools, and improve ventilation to reduce stale air pockets.
Problem: No pinning after full colonization.
Solution: Lower the temperature by two degrees, provide a brief period of light exposure, and verify that humidity remains high.
Conclusion
One now possesses a complete, environmentally friendly method for converting processed food waste into a nutritious harvest of oyster mushrooms. By following the six detailed steps, using the recommended starter kits, and applying the provided tips, one can achieve consistent yields while reducing kitchen waste. The practice not only supplies fresh, gourmet mushrooms but also demonstrates a circular approach to food production. Readers are encouraged to experiment with different waste materials and oyster varieties to refine their indoor farming skills.
Products Mentioned in This Guide


Frequently Asked Questions
What kinds of processed food waste work best as a substrate for oyster mushrooms?
Vegetable peels, coffee grounds, and shredded cardboard are ideal because they provide nutrients and a porous structure.
How should I prepare the food‑waste substrate before adding mushroom spawn?
Pasteurize the waste with hot water (around 65‑75 °C) for 1 hour, then let it cool and mix in the spawn evenly.
What temperature and humidity levels are optimal for indoor oyster mushroom cultivation?
Maintain 20‑24 °C (68‑75 °F) and 85‑95 % relative humidity, misting as needed to keep the surface damp.
How long does it typically take to see the first harvest after inoculating food‑waste substrate?
First pins appear in 5‑7 days, and mature mushrooms can be harvested in 10‑14 days.
Can the same substrate be used for multiple flushes after the first harvest?
Yes, after harvesting, keep the substrate moist and continue misting to encourage one or two additional flushes.