Introduction
In modern kitchens, an electric countertop composter offers a convenient way to turn food scraps into nutrient‑rich fertilizer. Over time, the sensor that monitors temperature or fill level may become inaccurate, leading to error messages or reduced performance. This guide explains how to diagnose a faulty sensor, obtain the correct replacement, and reinstall it safely. By following the step‑by‑step instructions, one will restore the device to quiet, odorless operation and extend its useful life.
What You’ll Need
- A replacement sensor compatible with the GoveeLife Electric Kitchen Composter (often supplied by the manufacturer).
- Phillips‑head screwdriver (size #2).
- Non‑static gloves to protect electronic components.
- Soft microfiber cloth for cleaning.
- Isopropyl alcohol (70% or higher) for cleaning contacts.
- Reference to the user manual or online support page.
The only product that will be directly referenced is the GoveeLife Electric Kitchen Composter, which provides the built‑in sensor architecture and serves as a reference model for part identification.
Step 1: Verify the Error Condition
Before disassembling the unit, confirm that the device is indeed displaying a sensor‑related error. The composter may show a "tank shortage alarm" or a "high‑temperature protection" message on the LED display. Open the companion app and navigate to the diagnostics section; the app will indicate whether the temperature sensor or the fill‑level sensor is reporting out‑of‑range values. Verifying the error prevents unnecessary disassembly and saves time.
Step 2: Prepare the Workspace and Safety Measures
Unplug the composter from the wall outlet and place it on a stable, heat‑resistant surface. Wear non‑static gloves to avoid electrostatic discharge that could damage sensitive electronic components. Using a Phillips‑head screwdriver, remove the two screws that secure the outer housing; these are typically located on the rear panel. The GoveeLife Electric Kitchen Composter is designed with a low‑noise motor (40 dB) and a compact footprint, making it easy to handle on a countertop without excessive vibration.
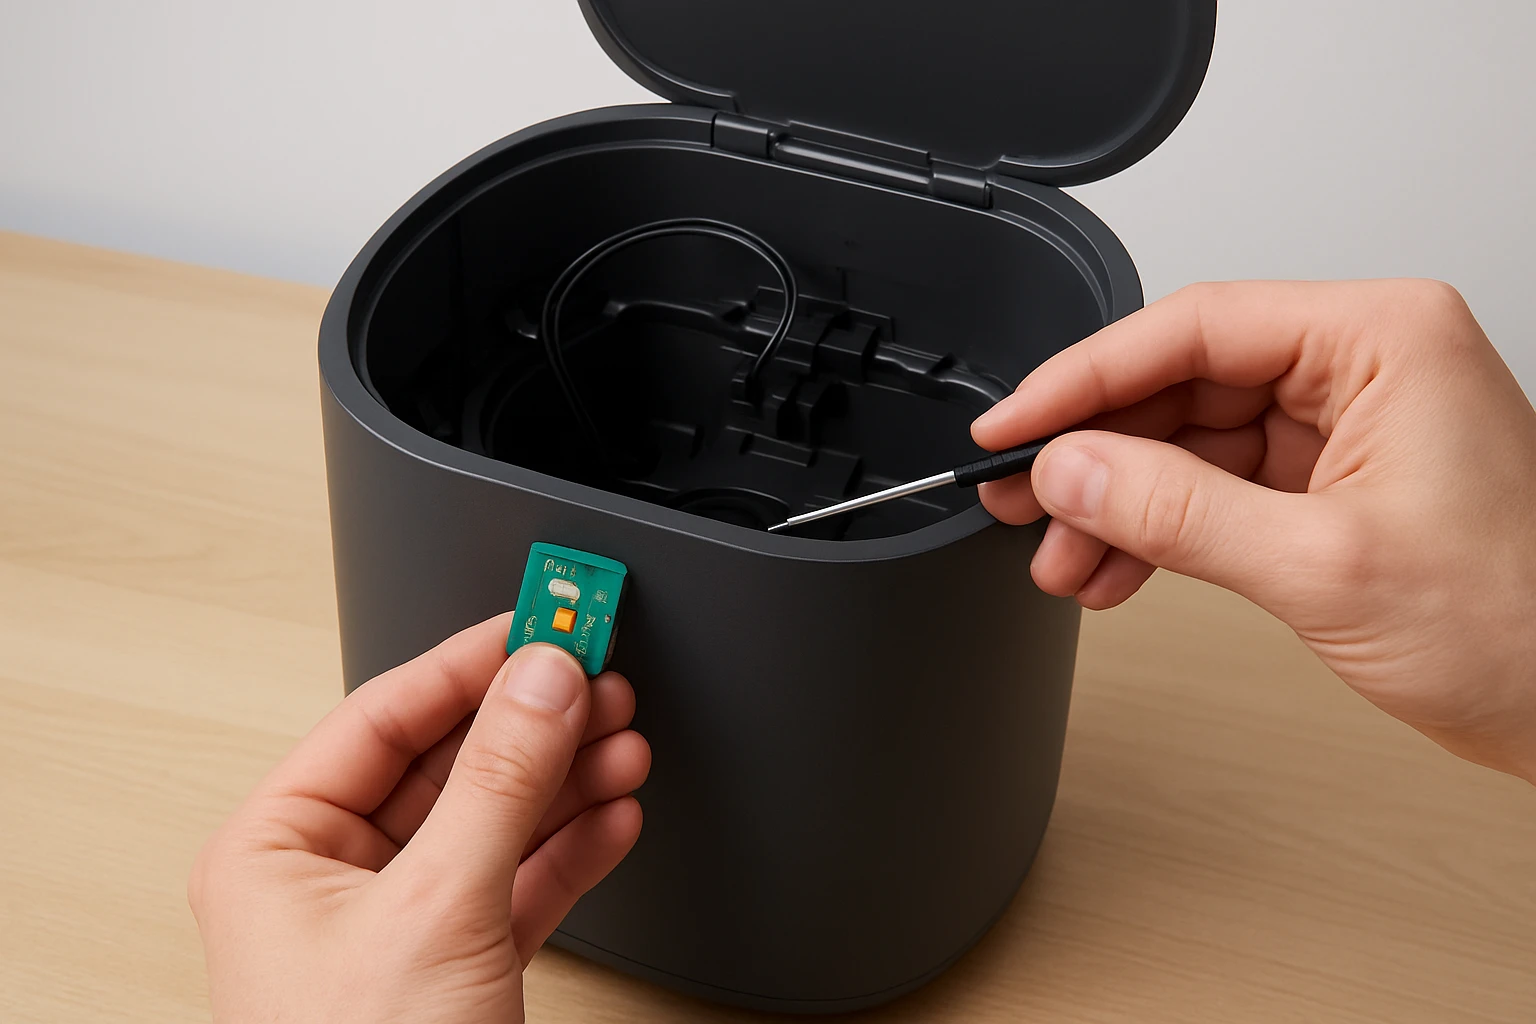
Step 3: Access the Sensor Module
With the outer housing removed, locate the sensor module near the inner tank. The temperature sensor is usually a small thermistor attached to the heating element, while the fill‑level sensor is a capacitive probe positioned at the top of the tank. Gently disconnect the sensor’s ribbon cable by lifting the locking tab; this prevents strain on the connector. If the ribbon cable appears dirty, clean it with a microfiber cloth dampened with isopropyl alcohol, allowing it to dry completely before proceeding.
Step 4: Remove the Faulty Sensor
Unscrew the mounting bracket that holds the sensor in place. Keep the screws in a small container to avoid loss. Carefully lift the sensor out of its housing; note the orientation of any pins or slots, as the replacement must be installed in the same direction. The compact design of the GoveeLife Electric Kitchen Composter ensures that the sensor is accessible without removing the internal grinding mechanism.
Step 5: Install the New Sensor
Insert the new sensor into the mounting bracket, aligning the pins precisely with the connector. Secure the sensor with the previously saved screws, applying just enough torque to avoid cracking the plastic housing. Reattach the ribbon cable, ensuring the locking tab clicks into place. The new sensor should match the specifications of the original: a thermistor with a resistance range appropriate for the 40 dB low‑noise heating system, and a capacitive probe calibrated for a 3 L tank capacity.
Step 6: Reassemble the Composter and Test
Replace the outer housing and reinstall the two screws removed in Step 2. Plug the unit back into the power outlet and power it on. Open the companion app and run a diagnostic check; the error message should disappear, and the sensor readings should fall within normal ranges. Initiate a short composting cycle to confirm that the temperature rises to the expected level and that the fill‑level indicator updates correctly. If the device operates silently and without odor, the repair is successful.Should any irregularities persist, consult the troubleshooting section below before contacting customer support.
Tips & Pro Tips
- Always handle electronic components on an anti‑static mat; static discharge can render a perfectly functional sensor unusable.
- When cleaning contacts, avoid excessive liquid; a lightly dampened cloth is sufficient.
- Label the screws from each step with a marker; this prevents cross‑installation errors.
- Consider scheduling a sensor calibration check every six months using the app’s built‑in tools; this maintains optimal performance.
- If the composter is under warranty, verify whether sensor replacement is covered before purchasing a new part.
Troubleshooting
| Problem | Possible Cause | Solution |
|---|---|---|
| LED continues to display "high‑temperature protection" after reinstall. | Sensor not seated properly or residual heat in the unit. | Power off the composter, allow it to cool for 30 minutes, then reseat the sensor and verify the ribbon cable lock. |
| Fill‑level indicator shows "tank shortage alarm" despite full tank. | Capacitive probe misaligned or dirty. | Remove the probe, clean with isopropyl alcohol, and reinstall ensuring correct orientation. |
| Device emits unusual noises after reassembly. | Grinding motor or internal components displaced. | Disassemble again, verify that the inner tank is correctly positioned, and reassemble carefully. |
Conclusion
Replacing a faulty sensor in an electric countertop composter restores its ability to process food waste efficiently, quietly, and without odor. By following the six detailed steps, one can safely diagnose the issue, procure a compatible replacement, and reinstall the component with confidence. Regular maintenance, such as cleaning the carbon filters and performing sensor calibrations, will prolong the lifespan of the GoveeLife Electric Kitchen Composter and keep the kitchen environment pleasant.
Products Mentioned in This Guide
Frequently Asked Questions
How can I tell if the sensor in my GoveeLife Electric Kitchen Composter is faulty?
If the unit shows error codes, inconsistent temperature readings, or stops detecting fill level, the sensor is likely malfunctioning.
What type of replacement sensor is required for the GoveeLife Electric Kitchen Composter?
You need the OEM sensor model specified in the user manual or the one sold by GoveeLife for that composter model.
Which tools do I need to replace the sensor safely?
A #2 Phillips‑head screwdriver, non‑static gloves, a microfiber cloth, and 70%+ isopropyl alcohol are sufficient.
How do I clean the sensor contacts before reinstalling?
Dip the cloth in isopropyl alcohol, gently wipe the contacts until no residue remains, and let them dry completely.
Will replacing the sensor affect my warranty?
If you use an authorized GoveeLife replacement part and follow the manual, the warranty remains intact; unauthorized parts may void it.