How to Certify Countertop Composter Compost for Donation: Step‑by‑Step Testing, Safety & Labeling
Introduction
The modern homeowner often seeks ways to turn kitchen waste into valuable soil amendment. One rewarding outcome is donating finished compost to community gardens, schools, or local farms. This guide explains precisely how to certify countertop composter compost for donation, ensuring it meets safety standards, passes laboratory testing, and carries clear labeling. Readers will learn the essential tools, testing procedures, and best practices that transform kitchen scraps into a trusted, nutrient‑rich product.
By following each step, one can avoid common pitfalls such as pathogen contamination, improper moisture levels, or ambiguous labeling that could jeopardize the donation. The result is a compost batch that is both environmentally responsible and legally compliant.
What You'll Need
- Countertop compost bin (e.g., a Bokashi or small tumbling unit)
- Organic kitchen waste (fruit peels, vegetable trimmings, coffee grounds)
- Thermometer capable of measuring 120‑160°F (49‑71°C)
- Moisture meter or simple squeeze test
- Laboratory testing kit for pathogens (E. coli, Salmonella) or access to a local extension service
- Protective gloves and mask
- TPS Nutrients Compost Accelerator – 8 oz liquid booster
- Sutter Signs Compost Stickers – 3‑pack weatherproof labels
Step 1: Gather and Sort Kitchen Waste
Begin by collecting only compostable kitchen residues. Separate fruit and vegetable scraps from meat, dairy, and oily foods, as the latter can introduce pathogens and slow decomposition. One should also rinse any heavily soiled items to reduce unwanted microbes. Place the sorted waste into the countertop composter, ensuring an even distribution to promote uniform breakdown.
At this stage, the use of a compost accelerator is not yet required; the goal is to create a balanced carbon‑to‑nitrogen ratio. A typical ratio of 30:1 provides optimal microbial activity. If the mixture appears too dry, add a small amount of water; if overly wet, incorporate shredded newspaper or cardboard.
Step 2: Activate the Compost with a Booster
After the bin has been filled for 24‑48 hours, introduce the TPS Nutrients Compost Accelerator. This liquid formulation is designed to jump‑start bacterial colonies, accelerating the breakdown of organic matter. Each 8 oz bottle contains enough product for several batches, and at a price of $10.19 it offers a cost‑effective solution for home composters.
The accelerator holds a rating of 4.1 out of 5 stars based on 47 reviews, indicating reliable performance among small‑scale users. To apply, dilute one capful (approximately 5 ml) in one liter of water and evenly spray the mixture over the compost surface. The added nutrients stimulate the microbes that convert waste into stable humus, reducing the overall processing time from weeks to days.
Using this product is advantageous compared with plain water because it supplies a balanced blend of nitrogen, phosphorus, and trace minerals. The result is a faster, more predictable composting cycle, which is essential when preparing material for donation within a limited timeframe.
Step 3: Monitor Temperature and Moisture
Effective compost must reach thermophilic temperatures (120‑160°F) for at least three consecutive days to eliminate harmful pathogens. Insert a calibrated thermometer into the core of the compost mass and record the reading twice daily. If temperatures fall below the target range, increase aeration by gently turning the bin or adding a small quantity of the accelerator.
Moisture content should remain between 40 % and 60 %. Perform the squeeze test by taking a handful of material; it should feel like a damp sponge that releases a few drops of water when squeezed. Excess moisture can create anaerobic conditions, while dryness stalls microbial activity.
Maintain these parameters for a minimum of four weeks, or until the compost resembles dark, crumbly soil with an earthy scent. At this point, the material is ready for safety testing.
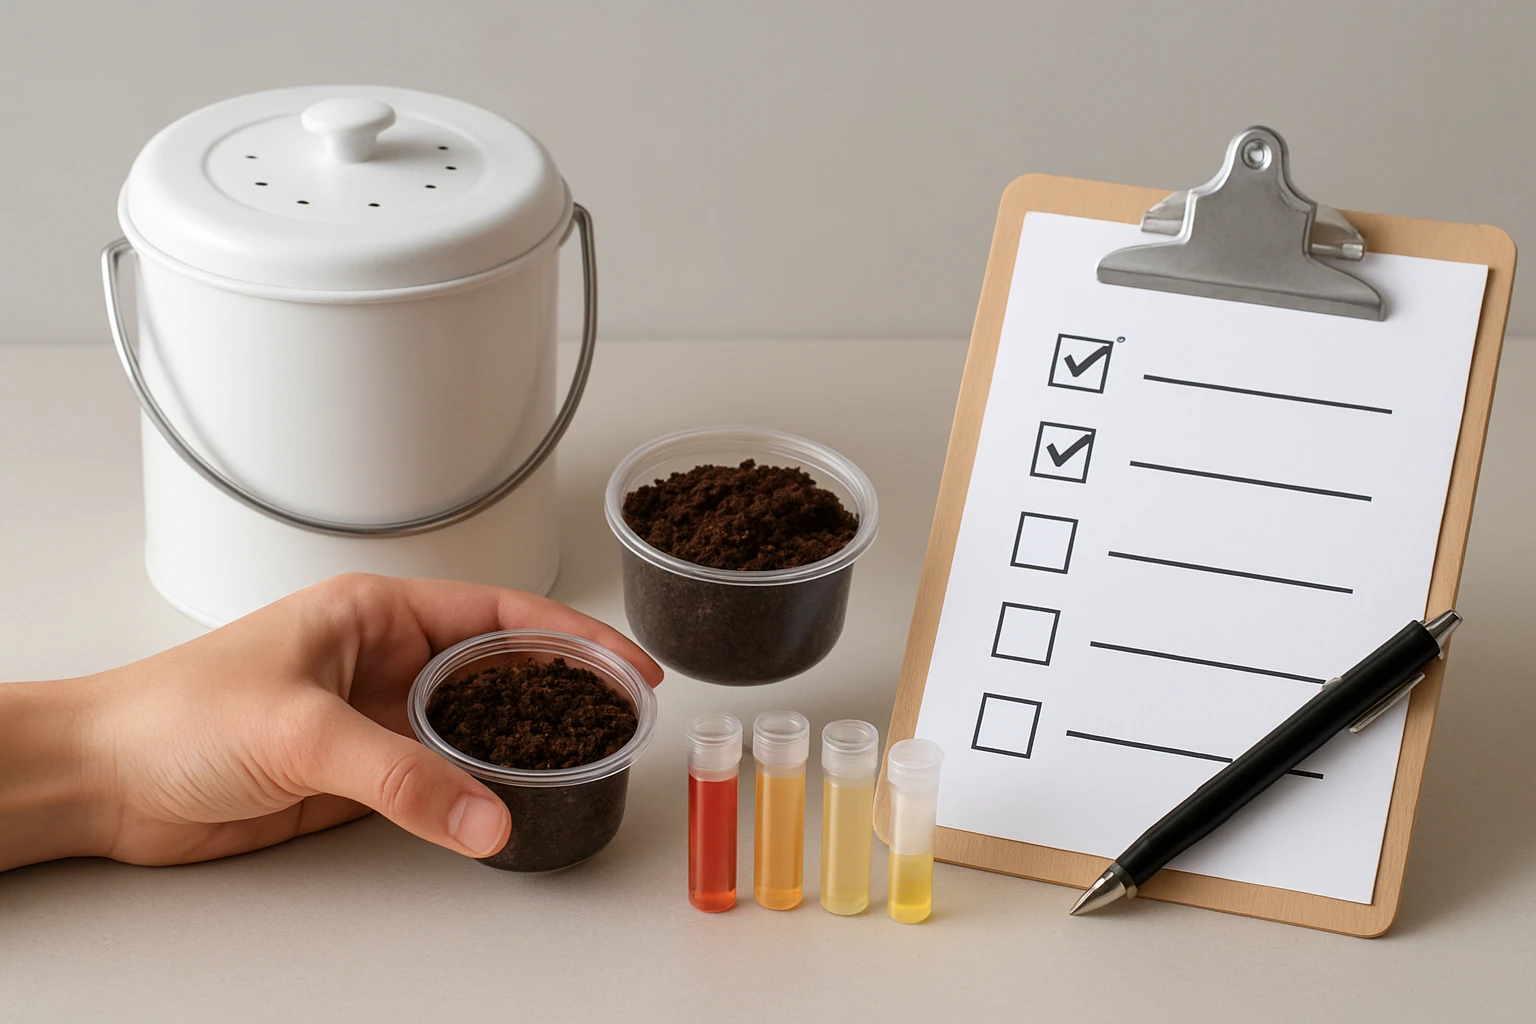
Step 4: Conduct Safety Testing
Safety testing is the cornerstone of certification. One may submit a sample to a local agricultural extension office or use a home testing kit that detects indicator organisms such as Escherichia coli and Salmonella. Follow the kit instructions precisely, wearing gloves and a mask to avoid contamination.
If laboratory results show pathogen levels below regulatory limits (often <10 CFU/g for E. coli), the compost can be considered safe for distribution. Should the test reveal elevated counts, return the batch to the composting phase, increase aeration, and re‑apply the accelerator to promote further microbial competition.
Document all test results, including date, method, and laboratory contact information. This record will be required by many donation programs to verify compliance with local health codes.
Step 5: Label the Compost Bins
Clear labeling prevents accidental mixing of compost with non‑compostable waste and informs recipients about proper handling. The Sutter Signs Compost Stickers provide a professional, weather‑proof solution. Each 3‑pack costs $4.44 and carries a 4.7‑star rating from 616 reviewers, reflecting durability and visibility.
The stickers are 4 inches in diameter, making them easily readable from a short distance. Apply one sticker to each compost container, ensuring the adhesive adheres firmly to the surface. The vinyl construction resists rain, UV exposure, and temperature fluctuations, which is essential for outdoor storage or transport.
Label content should include: "Certified Compost – Safe for Garden Use," the date of certification, and a brief note on the source (e.g., "Home Kitchen Compost – Tested 2026"). This information satisfies most municipal donation requirements and provides transparency to end users.
Step 6: Package and Transport the Compost
Once testing and labeling are complete, transfer the compost into clean, breathable bags or reusable containers. Avoid sealed plastic bags that trap moisture, as this can lead to mold growth during transport. Instead, use burlap sacks or compost‑grade paper bags that allow airflow.
Secure the containers within a sturdy box, and include a copy of the testing documentation. If delivering to a community garden, arrange a drop‑off time that aligns with their receiving schedule to minimize storage time.
By following these packaging guidelines, one ensures the compost arrives in the same condition as when it left the home, preserving its nutrient value and safety.
Tips & Pro Tips
- Rotate the compost bin every 24‑48 hours during the active phase to maintain oxygen flow.
- Combine the accelerator with a small amount of garden soil to introduce a diverse microbial community.
- Keep a logbook of temperature, moisture, and accelerator applications for future reference.
- When labeling, use a permanent marker to write the certification date directly on the sticker for added clarity.
- Consider adding a thin layer of finished compost on top of the batch to act as a protective cap against rain.
Troubleshooting
Problem: Compost does not reach thermophilic temperatures.
Solution: Increase the carbon‑to‑nitrogen ratio by adding dry leaves or shredded paper, and re‑apply the TPS Nutrients Compost Accelerator to stimulate microbial activity.
Problem: Persistent foul odor indicates anaerobic conditions.
Solution: Turn the compost more frequently, reduce moisture, and ensure adequate airflow by spacing the material loosely within the bin.
Problem: Sticker adhesive fails on smooth plastic containers.
Solution: Clean the surface with isopropyl alcohol before applying the Sutter Signs Compost Stickers, or use a small dab of double‑sided tape to reinforce adhesion.
Conclusion
Certifying countertop composter compost for donation requires careful preparation, activation, testing, and labeling. By employing the TPS Nutrients Compost Accelerator and Sutter Signs Compost Stickers, one can streamline the process, achieve reliable results, and meet safety standards.
One is encouraged to share the certified compost with local organizations, thereby contributing to community resilience and reducing landfill waste. The knowledge gained from this guide empowers individuals to turn everyday kitchen scraps into a valuable, environmentally friendly resource.
Products Mentioned in This Guide
Frequently Asked Questions
What temperature range must countertop compost reach to be considered safe for donation?
The compost should consistently reach 120‑160°F (49‑71°C) to kill pathogens.
Which tests are required to certify compost before donating it?
Laboratory analysis for pathogen levels, heavy metals, and nutrient content is typically required.
How do I measure moisture content in my countertop compost?
Use a moisture meter or the hand‑squeeze test; the material should feel like a damp sponge, about 40‑60% moisture.
What labeling information is mandatory on donated compost?
Include the source, batch date, test results, moisture level, and any certifications or safety warnings.
Are there legal regulations for donating home‑produced compost?
Yes, many jurisdictions require compliance with local health codes, certification by an accredited lab, and proper labeling before donation.